Keto Spinach Souffle

This souffle recipe is posted as a courtesy to those following a variety of low-carb and ketogenic diets (not necessarily Meal Plans designed by me). This recipe may or may not be appropriate for you.

Keto Spinach Souffle

When I was in my early teens, one of my favourite convenience foods was Stouffer’s® Spinach Souffle. I’m unsure whether it was discontinued or may still be available in eastern Canada, but it’s not in stores in Vancouver.

Stouffer’s® web page lists the ingredients in their Spinach Souffle as spinach, skim milk, eggs, water, soybean oil, modified tapioca starch, 2% or less bleached wheat flour, sugar, salt, and spice.

My keto version of Spinach Souffle uses spinach, whole eggs and egg whites, heavy cream, a touch of Parmesan, freshly ground salt and pepper and that’s it!  There are no industrial seed oils, no flour and no sugar.

Here’s my recipe. It is delicious as a vegetarian main course along with a spring green salad, or as a side dish to your favourite main.

Enjoy!

Keto Spinach Souffle as a vegetarian main course


Ingredients

6 large eggs
4 egg whites
2 cups (500 ml) heavy whipping cream
1/2 cup (50 g) Parmesan cheese, grated
2 x 300 g frozen chopped spinach (total 3 cups), defrosted and squeezed dry

Instructions

  1. Preheat convection oven with fan on to 400 °F (204 °C).
  2. Grease the sides and the bottom of an oval Pyrex dish with butter (or use non-stick spray)
  3. In a deep bowl, crack the eggs and beat well with a fork, then add the egg whites, and beat some more. Add the heavy whipping cream and mix well.
  4. Squeeze the defrosted spinach well until it is as dry as possible, then add it to the bowl with the eggs, cream and Parmesan*. Season well with freshly ground salt and pepper.
  5. When the oven is preheated, fill the Pyrex dish with the egg mixture and bake at 400 °F (204 °C) for one hour (or until nicely browned and well risen.

* for those sensitive to oxalates, blanching the spinach in boiling water and then shocking it in an ice bath before squeezing it dry will significantly lower the oxalate content. A 2005 study found that boiling high oxalate vegetables can reduce oxalates by as much as 87% (J. Agric. Food Chem. 2005, 53, 8, 3027-3030, https://doi.org/10.1021/jf048128d)

Serve and enjoy!

from Cronometer

If you would like more information about the services I provide please have a look under the Services tab. If you have questions, please feel free to send me a note using the Contact Me form above, and I will reply as soon as I can.

You can follow me on:

Twitter: https://twitter.com/lchfRD
Facebook: https://www.facebook.com/lchfRD/
Instagram: https://www.instagram.com/lchf_rd
Fipboard: http://flip.it/ynX-aq

Copyright ©2019 LCHF-RD (a division of BetterByDesign Nutrition Ltd.)

Homemade Yogurt – Crock-Pot and Inkbird controller method

This recipe is posted as a courtesy to those following a variety of low-carb and ketogenic diets (not necessarily Meal Plans designed by me). This recipe may or may not be appropriate for you.

INTRODUCTION: Years ago, I used to make my own homemade yogurt using the pilot light in my gas oven to incubate it, but that was a long time ago. Unfortunately, my last few homes had electric stoves and not gas and purchasing yogurt just seemed more ‘practical’. Recently I switched from cow’s milk to goat’s milk to avoid A1 beta-casein that was negatively impacting my joints (you can read about A1 beta casein here), so I recently decided to start making my own Greek goat yogurt.  My first reason to make my own was because the goat yogurt available on the market did not have the classic thick texture of “real” Greek yogurt, and the second reason was that making my own — even with premium milk such as goat milk or A2 beta-casein milk from heirloom cows still costs half of what it does in the store. Finally, making it myself, I can control what’s in it. Mine has no skim milk powder or gelatin; it’s just full-fat milk and yogurt culture.

Homemade Goat-milk Greek Yogurt

Oven Method

The first time I made yogurt recently, I incubated it in my electric oven by preheating it to 200° F (93°C), turning the heat off and allowing it to cool to 110° F (43° C). Then I turned the oven light bulb on to maintain the ambient temperature, and since ovens are so well insulated, it worked as well as it used to in my old gas oven years ago.

Crock-pot® and Inkbird® Method

When I posted my first results, someone online suggested I used an old Crock-pot® to incubate it, but when I had investigated that idea previously, the lowest setting on mine was too hot for the purpose. The “Lo” setting ranged between 140-145°F (60-63°C) which would kill the bacterial culture, so that’s why I used my old oven method.

This person suggested I purchase an Inkbird® plug and play temperature controller that could be set up between the Crock-pot® and the power supply, in order to maintain the temperature at a steady 110° F (43°C) for the duration of the incubation time. That sounded terrific so I ordered one online.

The cool thing is the Inkbird® temperature controller can also be used to turn the same old Crock-pot® into sous-vide; which I will definitely try at some point, too!

Below are step-by-step instructions for making both regular and Greek yogurt.

Homemade Yogurt – Crock-Pot® and Inkbird® controller method

  1. Pour 3 liters of fresh goat milk (or other mammal milk) into a heavy bottom pot.
  2. Heat the milk at a medium-low heat until the milk reaches 180° F (82 ° C), stirring occasionally. It takes a while, but don’t rush it by turning it up or it will scald on the bottom of the pot, losing some of the valuable thickening protein. Once it reaches temperature,  turn the heat down just enough to maintain the temperature stable for 20 minutes.*

    * Heating the milk is essential even if the milk is pasteurized, as it transforms the proteins. Holding the milk at 180° F (82°C) for 20 minutes makes the difference between runny and full-bodied yogurt (even if you don’t strain it to make it Greek-style).
  3. Pour the hot milk into the removable ceramic insert of the Crock-pot®, then cover it and let it cool until it reaches 110-115° F (43°- 46°C) . Since this can take several hours, I use a cold water bath to speed things up if I want to get it incubating sooner and stir it with a sterilized stainless steel whisk as it sits in the cold water, to make sure it cools uniformly so the thermometer reading is accurate.
  4. Once the milk has cooled to just above 110°F (43°C), remove 1 cup of it (250 ml) to a bowl and add 1/2 cup (125 ml) of the starter you are using.  I use a previous batch of my own yogurt, but start the first batch with some fresh commercial goat yogurt. Remember that each type of milk needs a different type of starter so be sure to buy one that is made from the same type of milk as you’re using. Stir the starter and cup of warmed milk back into the Crock-pot® and stir gently to distribute it evenly.
  5. Put the insert into the base of the Crock-pot® and insert the plug of the Crock-pot® into the power receptacle of the Inkbird® thermometer controller, then plug the controller into the wall.
  6. Set the temperature on the controller to 110° F (43°C) for 12 hours and then have it go off.
  7. Insert the probe into the warm milk that has the starter added.
  8. After 12 hours, remove the probe and unplug the Inkbird®.

At this point, you have plain yogurt which can be packaged up into containers and cooled in the refrigerator for 12 hours before eating.

For Greek Yogurt

  1. Line a stainless steel colander or strainer with a clean piece of white cotton cloth and attach it firmly to the edges with clips.
  2. Insert the strainer or colander into a large bowl that will catch the large amount of whey that will drain off.  Keep in mind, about 35-40% of the finished yogurt is whey, which is what is being removed by draining.

    amount of whey after 1 hour of draining
  3. Pour in yogurt and while it is draining, cover the strainer.
  4. Let the whey drain out in the fridge or in an oven that has been warmed and cooled to 110°F (43°C) and has the light bulb on.  Remember, that while straining, the yogurt needs to be either in the fridge or at the same temperature it incubates at, to keep it out of the temperature “danger zone”.
    Mine goes into a warmed, cooled oven because my fridge always has too much food in it to accommodate a large bowl!
  5. Drain the yogurt until the mixture is the thickness you like. I drain mine for 12 hours so that it is very thick.
  6. Package it up into sterilized containers with covers and let it chill 12 hours in the fridge before eating.

    Enjoy as is, or with a sprinkle of hemp hearts and berries.

Macros – 3/4 cup / 175 ml of plain Greek Goat Yogurt

Carbohydrates: ~6 g
Protein: ~15 g
Fat: ~10 g

You can follow me on:

Twitter: https://twitter.com/lchfRD
Facebook: https://www.facebook.com/lchf-rd/
Instagram: https://www.instagram.com/lchf_rd
Fipboard: http://flip.it/ynX-aq

Copyright ©2019 The Low Carb Healthy Fat Dietitian (a division of BetterByDesign Nutrition Ltd.)

LEGAL NOTICE: The contents of this blog, including text, images and cited statistics as well as all other material contained here (the ”content”) are for information purposes only.  The content is not intended to be a substitute for professional advice, medical diagnosis and/or treatment and is not suitable for self-administration without the knowledge of your physician and regular monitoring by your physician. Do not disregard medical advice and always consult your physician with any questions you may have regarding a medical condition or before implementing anything  you have read or heard in our content.

Share to Flipboard:

Keto Quiche Lorraine

This recipe is posted as a courtesy to those following a variety of low-carb and ketogenic diets (not necessarily Meal Plans designed by me). This recipe may or may not be appropriate for you.

I’ve been thinking about different ways to enjoy eggs and remembered an authentic Quiche Lorraine recipe that I invented  years ago. I used to make it when my grandmother (who was from Paris) would come for lunch, and I remember it rivaled the quiches from the shops in Quebec. It took some searching, but I found the card in one of my four recipe boxes and then pondered how to make a keto crust.

I was busy and didn’t have time to over-think it so I did it instinctively. I threw some almond flour in my food processor and 1/2 the amount of coconut flour (my usual ratio), cut in some ice cold unsalted butter.

[Please do NOT use shortening in this recipe or any recipe.  Here’s why: https://www.lchf-rd.com/2018/04/05/concerns-with-polyunsaturated-vegetable-oils/]

Instead of binding it with ice water (the way I would make a regular pastry crust), I cracked in a cold fresh egg.  I could tell when I pulled it from the processor that this was going to be perfect!  I cut the dough in 1/2 and wrapped it in plastic wrap and let it chill a few hours (a necessary step in making a flaky crust) and went back to work.

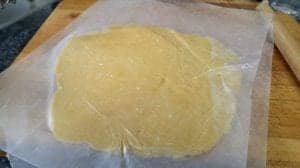
Making it before dinner was easier than I imagined, or easier than I remembered it as a younger woman. I preheated the oven to high and began to roll out the dough between pieces of waxed paper and placed them each in large Pyrex (glass) pie plates.

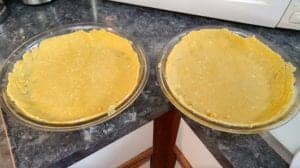
I didn’t flute the edges because there wasn’t quite enough extra dough for that, but for quiche it isn’t necessary anyway.

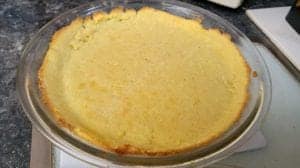
I pre-baked the crusts and could tell as I pulled them out of the oven that these were going to be amazingly flaky!

I lowered the heat to the temperature to start baking the quiches and proceeded to saute the onion, cut up the smoked turkey leg (used in place of ham) and grate the emmenthal (a Swiss cheese). Then I began cracking the eggs,  discarding the whites and then added fresh heavy cream.

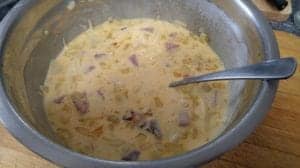
I added the hot onion last (so it wouldn’t cook my eggs before I got the mixture in the crusts). I poured half the mixture into each of the two pre-baked pastry shells and popped them into the oven.

The smell of them baking was divine! I’m not a big ‘egg person’ but do I love quiche!

I put them on two racks to cool and was more than glad that at that point family arrived for dinner hungry.


I made a huge tender ruby red salad and plated the quiche.

It did not disappoint!


Here’s the recipe:

Keto Quiche Lorraine – makes 2 pies

All Butter Flaky Pie Crust

1 cup almond flour
1/2 cup coconut flour
1 cup butter, cold
1 large egg

Add the 2 flours to the bowl of a food processor and add chunks of the ice cold butter. Pulse process it until the flour looks like course sand (don’t run the processor, only pulse it to cut in the butter). Crack in an egg and pulse 2-3 times until the dough comes together.  Remove it from the bowl and finish gathering it together by hand.  Form a ball, cut it in half and place the two halves in the refrigerator for several hours.

When ready to make the Quiche Lorraine;

1. Preheat the oven to 475 F.
2. Roll out the pastry crusts between sheets of waxed paper and place each one in a Pyrex (glass) pie plate.
3. Place in the oven immediately (so the butter doesn’t warm up, otherwise it won’t be flaky).
4. Bake 8 minutes and remove from oven.

While the crusts are pre-baking, saute the onion and make the filling.

Quiche Lorraine Filling

6 egg yolks, plus 2 whole eggs
1 cup diced naturally smoked turkey (or thick cut naturally smoked ham)
1 medium onion, diced finely and sauteed in 1 Tbsp of butter
2 cups heavy cream
1 cup Emmenthal (can use Swiss or Gruyere cheese)
freshly ground pepper
(no salt is needed because the smoked meat and the cheese are salty)

1. saute the onion in the butter
2. in a medium size bowl, beat the egg yolks and whole egg
3. add the diced smoked turkey (or ham)
4. coarsely grate the Emmenthal and add to mixture
5. pour in heavy cream
6. season with plenty of coarsely ground black pepper

When the pie crusts come out of the oven, lower the heat to 400F and when the mixure is ready, fill the pie shells and bake immediately for 20 minutes and 400F, then lower the heat to 350F and continue baking for ~15 minutes more. Watch them closely, because they shouldn’t be too dark on top.

Serve with a large baby green salad and enjoy!

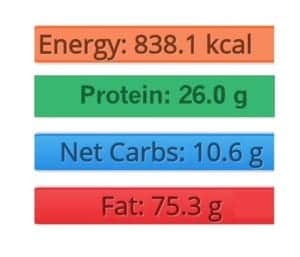
Macros per slice (1/4 of A large quiche -2 servings)

If you would like some information about how I can help you follow a low-carb or ketogenic lifestyle, please send me a note using the “Contact Me” form above.

Remember, I provide both in-person services, as well as appointments via Distance Consultation (telephone / Skype) so whether you live in the greater Vancouver area, in another part of Canada or the world, I’m here to help.

To our good health!

Joy

If you would like to read well-researched, credible ”Science Made Simple”  articles on the use of a low carb or ketogenic diet for weight loss, as well as to significantly improve and even reverse the symptoms of Type 2 Diabetes, high cholesterol and other metabolic-related symptoms, please  click here.

You can follow me at:

 https://twitter.com/lchfRD

  https://www.facebook.com/lchfRD/


Copyright ©2018 The LCHF-Dietitian (a division of BetterByDesign Nutrition Ltd.) 

LEGAL NOTICE: The contents of this blog, including text, images and cited statistics as well as all other material contained here (the ”content”) are for information purposes only.  The content is not intended to be a substitute for professional advice, medical diagnosis and/or treatment and is not suitable for self-administration without the knowledge of your physician and regular monitoring by your physician. Do not disregard medical advice and always consult your physician with any questions you may have regarding a medical condition or before implementing anything  you have read or heard in our content